
Part 2: Building and Installing Proxmox on a Lenovo M720q
Part 2 is all about getting Proxmox installed on the Lenovo M720q nodes and expanding the rest of the cluster. Before we dive in though, it’s worth taking a step back and reminding ourselves what each node is actually supposed to be doing, because the hardware choices only really make sense in that context.
The Proxmox Nodes
#1 “Hawking” – Core Networking
This one’s handling all the critical network stuff: the router (OPNsense), DNS (Adguard & Pihole), reverse proxy (Caddy or NGinx RP), and the Unifi wireless controller.
Hardware: Intel i3-8100T (quad-core), 16GB RAM (2x8GB Dual Channel), Intel Optane 16GB (M.2 A+E, boot), 256GB NVMe (M.2 2280, datastore), X710-DA2 2x SFP+ 10Gb NIC (PCIe).
Reliability is the name of the game here. This machine is essentially the front door of the whole network, so if it goes down, everything goes down with it – not ideal. The 2x10GbE ports give it enough headroom to handle both full-fibre WAN and LAN/VLAN traffic without becoming a bottleneck. Splitting the boot and VM drives is a deliberate choice. Pairing a high-endurance Intel Optane drive for the OS with a fast NVMe for VMs means I can optimise each for what it’s actually doing, and recover more cleanly if something goes wrong. This node also needs to support high availability and live migration, so it’s doing quite a bit of heavy lifting for such a small box.
#2 “Einstein” – Self-Hosting
This is where all the fun stuff lives: a dashboard, Home Assistant for smart home control, Paperless NGX for documents, Immich for photos, and maybe a password manager.
Hardware: Intel i5-8400T (hexa-core), 32GB RAM (2x16GB Dual Channel), Intel Optane 16GB (M.2 A+E, boot), 1TB NVMe (M.2 2280, datastore), 1x 2.5GbE NIC (PCIe).
More RAM, more cores. Running several applications simultaneously means this node needs to punch above its weight, and the bump up to 32GB gives it plenty of room to breathe. The 1TB NVMe provides enough storage to comfortably run production workloads while still leaving space to spin up test environments and experiment without worrying about running out of room. The 2.5GbE NIC frees up the onboard NIC for Corosync networking.
#3 “Newton” – Storage & Backup
The NAS and backup server. This’ll run TrueNAS, Proxmox Backup Server, a media server, and eventually NextCloud for cloud storage.
Hardware: Intel i5-8400T (hexa-core), 16GB RAM (2x8GB Dual Channel), 256GB NVMe (M.2 2280, boot and datastore), ASM1166 SATA controller (PCIe), 1x 2.5GbE NIC (M.2 A+E).
The main requirement here is PCIe passthrough. TrueNAS really needs direct access to the drives rather than going through a hypervisor layer, so passing through a HBA or SATA controller is a must. Beyond that, there’s enough compute headroom to handle NextCloud and potentially transcoding via Jellyfin down the line. The 2.5GbE NIC is a step up from standard gigabit, which makes a noticeable difference when we’re shuffling large files around the network.
Hardware Assembly
I won’t dive too deep into a thorough step-by-step, as the hardware is very well documented. ServeTheHome cover the teardown of the Lenovo M720q on their comprehensive review and accompanying video:
That said, there are a few things specific to this build that are worth mentioning, so rather than rediscussing what’s already out there, I’ll focus on the bits that caught me out or required a deliberate decision. Let’s start with Node #1, which I’ve named Hawking.
Storage – Intel Optane and NVMe
One thing worth knowing about Proxmox before you go buying drives for it – it’s notoriously hard on consumer NVMe and SSD storage. The write amplification from its journaling and logging can chew through a budget drive faster than you’d expect. To mitigate this, I went with super high endurance Intel Optane drives for the boot/OS drive. Alongside that, I’m running a separate NVMe drive purely as a datastore for VMs and containers. Keeping them on separate disks is a deliberate choice. If Proxmox ever needs to be wiped and reinstalled, the datastore is completely untouched. Clean separation with easier recovery.
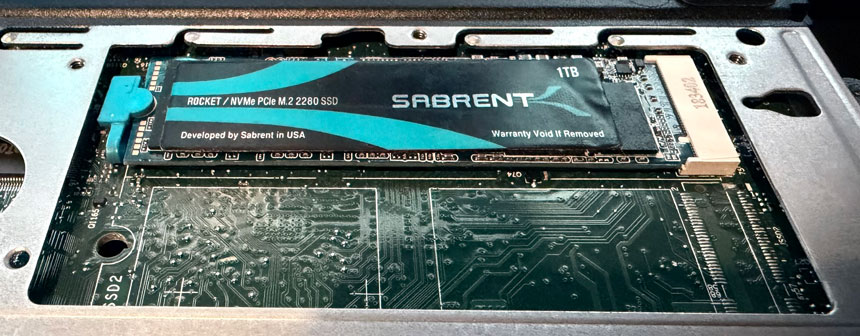
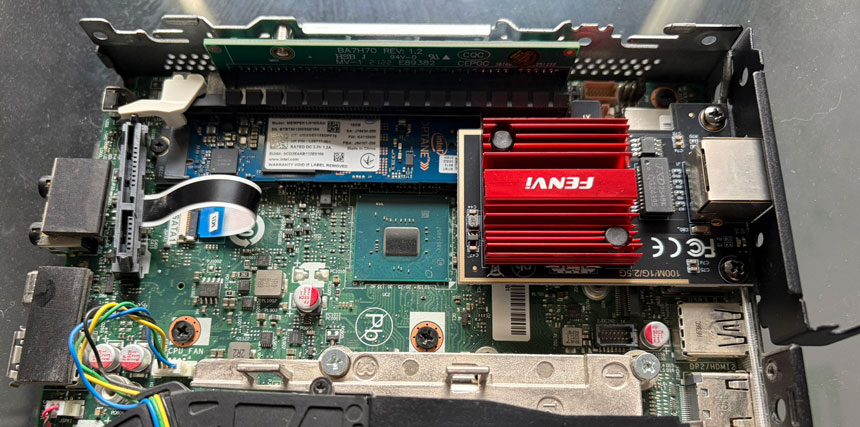
Now, here’s where the M720q throws a small spanner in the works. Unlike the M920x which has dual M.2 2280 slots, the M720q only has a single M.2 2280 slot for storage. The second slot is unpopulated but those brave enough with micro-soldering may choose to add it. I certainly am not one of those souls! It does, however, have a second M.2 slot, an A+E keyed 2230-size slot that’s normally used for the WiFi adapter (offering 1x PCIe 3.0 lane). With a cheap M.2 A+E to M-key adapter, I was able to slot the Intel Optane drive in there instead, tucked under the Lenovo riser.
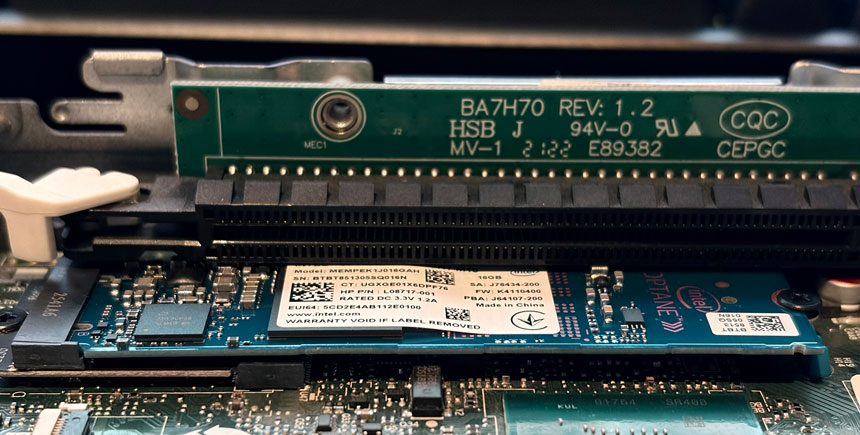
There is a catch though. The BIOS doesn’t make it easy to select this slot as a boot drive. It simply doesn’t show up as an obvious option in the boot order menu, although there may be a hack that I haven’t yet explored using legacy bios boot mode. The good news is that the Proxmox installer has no trouble detecting the drive, and once the OS is installed, the system actually auto-selects it as the boot drive without any fiddling. It works, it’s just a little opaque about how. One thing to bear in mind though: if you ever go digging around in the boot order settings and change something, there’s a chance it could upset this default behaviour. Probably best to leave that particular setting well alone once it’s working.
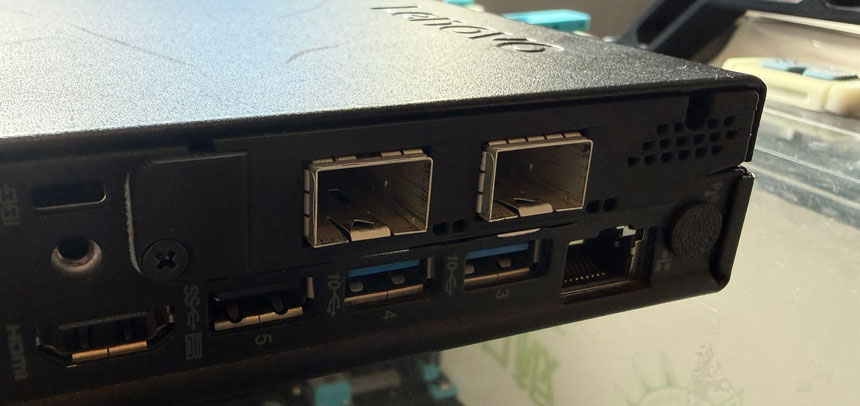
NIC – Intel X710-DA2
When I originally rebuilt the server, moving from an Intel i340-T4 (4x1Gb) to an Intel X550-T2 (2x10Gb Base-T RJ45) led to a jump from 8W idle to 17W idle. It turned out that specific NIC did not support ASPM (Active State Power Management) and the CPU was stuck in a higher powered C3 state. I figured that this node would be running 24/7, so every watt mattered. With that in mind, 10GbE Base-T RJ45 was ruled out in favour of 10GbE SFP+ with passive DAC cabling. After going down the ASPM rabbit hole, I settled on the Intel X710-DA2, which has a solid reputation for actually honouring ASPM correctly with reasonable second-hand pricing.
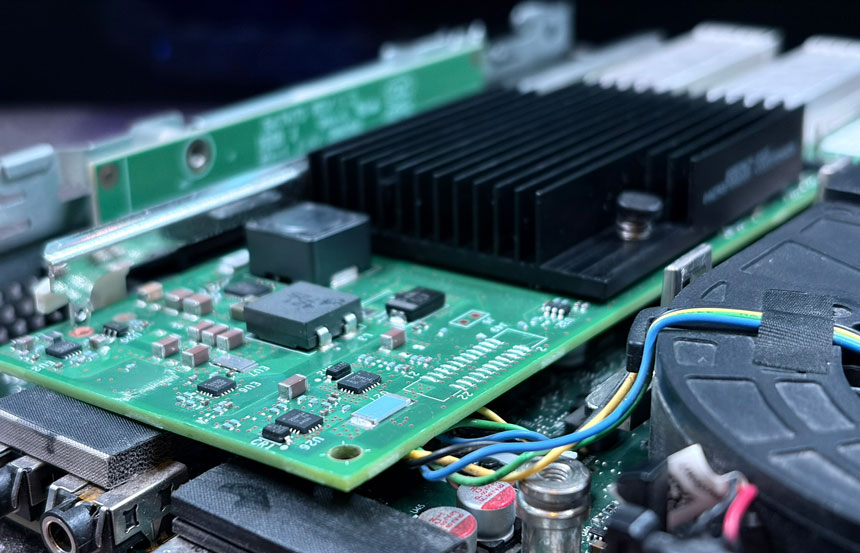
The only mild drama is the physical size. It just fits inside the 1 litre M720q chassis. Whilst this card is low profile, it measures long at 17cm. Fitting this in the M720q requires removal of the WiFi/Bluetooth antenna and frame.

For a “factory finish”, I 3D printed a rear support baffle, using ABS for heat resistance.
Proxmox Installation
Proxmox’s own installation documentation is pretty thorough and is worth reading in its entirety. However, there are some choices we’ll encounter during the installer that aren’t immediately obvious, and where making the wrong call early on can be a bit of a pain to address later.
Bios Settings
Before touching the Proxmox installer, there are a few BIOS settings worth configuring first. I am running the latest Lenovo M720q official BIOS, version M1UKT78A dated 12/04/2025.
ADVANCED - CPU Setup
    Intel(R) Virtualization Technology    Enabled
    VT-d                                  Enabled
    C State Support                       C1C2C3C6C7C8C10

SECURITY - Secure Boot
    Secure Boot                           Disabled

STARTUP
CSM DisabledThe CPU settings are fairly standard Proxmox prep. Enabling Intel VT and VT-d unlocks hardware virtualisation and IOMMU support, both of which we’ll need for things like PCIe passthrough later on. Enabling the full range of CPU C-states (all the way up to C10) allows the processor to drop into its deepest idle power states, maximising efficiency.
The general consensus is that Secure Boot with Proxmox tends to create more hassle than it’s worth, particularly when we start loading custom kernel modules, third-party drivers or messing with passthrough configurations. It’s one of those things that’s easier to leave off from the start than to debug later. We can leave CSM (Compatibility Support Module) disabled to ensure a clean UEFI boot.
Creating the Bootable USB Installer
I used Windows’ built-in Diskpart utility to wipe and format an 8GB USB drive to FAT32, then used Rufus (the portable version, so no installation needed) to flash the Proxmox ISO onto it. Rufus automatically defaults to DD mode for this, which is what we want.
Installing Proxmox on Node #1 “Hawking”
We boot into the Proxmox installer, making sure to prioritise the USB drive in the BIOS boot order. Choosing the graphical installer is a sensible choice here, with the terminal UI reserved for older hardware.
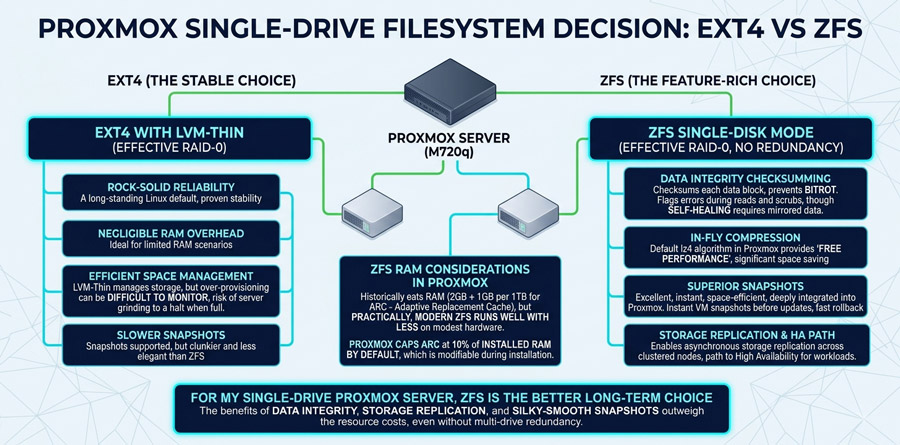
Filesystem – EXT4 vs ZFS
One major early decision is the filesystem. With our particular M720q setup, we are limited to a single OS drive, ruling out multi-drive ZFS configurations and redundancy. This leaves us with ext4 (with LVM-thin) and ZFS in single-disk mode (effectively RAID-0, meaning no redundancy). Both have their pros and cons, but our use case pushes us towards ZFS.
Ext4 is the boring choice. It’s been the default Linux filesystem for years, it’s rock-solid, and it uses virtually no extra RAM overhead. With LVM-thin it is efficient in managing its storage space but, unlike ZFS, it can become difficult to know when that space becomes nearly full from over-provisioning, at which point the entire server grinds to a halt. Snapshots are still supported, but they’re slower and less elegant than ZFS snapshots. On old hardware with limited RAM, ext4 serves its purpose well.
ZFS on the other hand has numerous benefits, albeit at the cost of hardware resource. ZFS will checksum each block of data that’s on the disks it uses, preventing bitrot. On a single-disk setup, self-healing won’t occur (as there is no mirrored data), but it will at least flag the error during reads and scrubs. Who doesn’t love free performance? ZFS compresses data on-the-fly, with the low CPU overhead lz4 algorithm turned on by default in Proxmox. Along with compression, ZFS snapshots are genuinely excellent. They’re instant, space-efficient, and deeply integrated into Proxmox. Snapshotting a VM before a dodgy update takes seconds, and rolling back is just as fast. The LVM-thin snapshots you get with ext4 work, but they’re clunkier. Finally, ZFS in Proxmox enables Storage Replication across clustered nodes – an asynchronous, low-effort path to High Availability for more important workloads.
ZFS historically eats RAM, with 2GB + 1GB per 1TB recommended for its performance-enhancing ARC (Adaptive Replacement Cache). However, in practice, modern ZFS runs well with less and Proxmox caps ARC at 10% of installed RAM by default (modifiable during installation), making it far more reasonable on modest hardware. For me, ZFS is the better long-term choice even on a single drive. The data integrity and Storage Replication features alone make it worth it, even before you factor in those silky-smooth snapshots!
We’ll configure the installation of Hawking as follows: ZFS (RAID0) on the Intel Optane 16GB drive (nvme0n1) with 2GB of RAM as ARC.
Network Configuration
Network configuration during installation deserves a bit of thought, because what we set here ties directly into our final networking topology. The most important thing to be aware of is Corosync, which is Proxmox’s cluster communication layer. Corosync is extremely sensitive to latency. Even brief latency spikes can trigger a chain reaction that destabilises the entire cluster. Those spikes happen more often than you’d think, typically during high-bandwidth activities like file transfers or backups. For that reason, it’s strongly recommended to give Corosync its own dedicated, isolated network, completely separate from your regular LAN traffic.
That said, on a small low-traffic homelab like this one, a dedicated Corosync network isn’t strictly essential from day one. It’s something we can add to the cluster later if needed. But since we’re building this from scratch, we may as well do it properly. Here’s how the final network topology appears across the cluster:
|
Node: |
Core Network: |
Corosync Network: |
|
Node#1 Hawking |
X710-DA2 10GbE #1 (via RJ45 module) – WAN X710-DA2 10GbE #2 – LAN/Maintenance |
Onboard 1GbE |
|
Node#2 Einstein |
2.5GbE (RTL8125 via PCIe) – LAN |
Onboard 1GbE |
|
Node#3 Newton |
2.5GbE (RTL8125 via M.2 Adapter) – LAN |
Onboard 1GbE |
In this configuration, the core LAN network is on a separate subnet (10.1.1.x) to the Corosync network (10.1.10.x). We’ll explore this in future posts, but in the meantime we’ll configure the installation of Hawking as follows:
- Management Interface: nic1 (see “pinning” below)
- Hostname (FQDN): hawking.lan.domain.com (replace domain.com with one of your choosing)
- IP Address (CIDR): 10.1.1.10
- Gateway: 10.1.1.1 (your router IP)
- DNS Server: 1.1.1.1 (our own DNS IP, but you could use Cloudflare’s public DNS 1.1.1.1)
- Pin network interface names: Enabled (we will use modern naming conventions)
- eno1 (this corresponds to your onboard 1GbE port)
- nic1 (this corresponds to the first 10GbE NIC port)
- nic2 (this corresponds to your second 10GbE NIC port)
Finalising Installation
On the last screen of installation, your final Proxmox summary should look like this:
|
Option |
Value |
|
Filesystem: |
zfs (RAID0) |
|
Disk(s): |
/dev/nvme0n1 |
|
Country: |
United Kingdom |
|
Timezone: |
Europe/London |
|
Keymap: |
en-gb |
|
Email: |
|
|
Management Interface: |
nic1 |
|
Hostname: |
hawking.lan.yourdomain.com |
|
IP CIDR: |
10.1.1.10 |
|
Gateway: |
10.1.1.1 (my router’s IP) |
|
DNS: |
10.1.1.1 (my DNS server’s IP) |
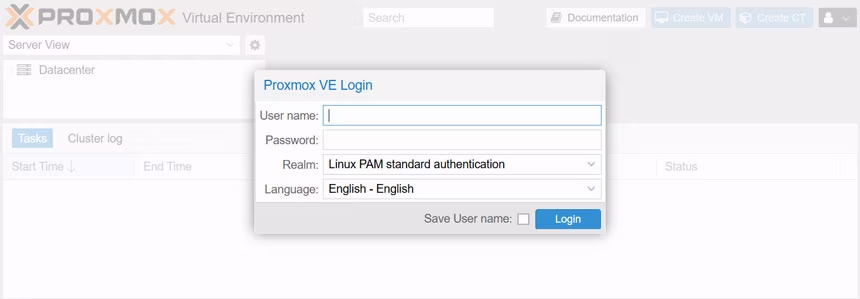
After rebooting with the USB Installation disk removed, you should return to the Proxmox shell. Once installation is complete, each node is accessible via the Proxmox web UI at https://<IP-ADDRESS>:8006 (in Hawking’s case this will be at https://10.1.1.10:8006). Log in with the username root and the password you set during installation. The machine which accesses this interface must be on the same subnet as the Proxmox server (10.1.1.x).
Deploying Node #2 “Einstein” and Node #3 “Newton”
Building out Einstein and Newton follows much of the same process as Hawking – same BIOS settings, same Proxmox installation steps. Where things diverge is the hardware configuration, since each node has its own specific role and the physical setup reflects that. Let’s run through what’s different.
Hardware Configuration
Einstein is the workhorse for self-hosted applications, so the storage is scaled up accordingly. A 1TB NVMe sits in the M.2 2280 slot paired with 32GB of RAM, giving plenty of room for production workloads and a bit of breathing space for experimentation. On the networking side, there’s no need for 10GbE speeds here. Instead, a budget Realtek RTL8125B PCIe card covers the job with a single 2.5GbE Base-T RJ45 port – more than adequate for LAN traffic on an application server.
Newton’s role as the NAS and storage node makes the hardware build a bit more complicated. The PCIe slot is occupied by an ASM1166 SATA controller, passed through to a TrueNAS VM. We therefore have to install the Realtek RTL8125B 2.5GbE NIC into the M.2 A+E slot, the same trick used for the Optane drive on the other nodes. With the M.2 A+E slot taken up by the NIC adapter, there’s no room for a boot drive here.
The straightforward option is to just use the M.2 2280 NVMe slot for both the OS and the datastore. Simple, but not ideal from a separation and endurance standpoint. The more creative option? Shucking a small SSD from its housing and connecting the bare PCB directly via the internal SSD ribbon cable connector that the M720q conveniently provides. It’s a bit unconventional, but it gets you that separate boot drive without sacrificing any of the other slots.
Proxmox Installation
Installation on Einstein and Newton follows exactly the same process as Hawking, the only real differences are the hostname and IP address, which are unique to each node. One thing to note during the networking stage: keep the onboard 1GbE port as eno1 (Corosync traffic) and the additional 2.5GbE port as nic1 (LAN/Management traffic). We’ll be referencing these interface names later, so it’s worth being consistent across all three nodes from the start.
|
Option |
Node 1 |
Node 2 |
Node 3 |
|
Hostname: |
hawking |
einstein |
newton |
|
IP CIDR: |
10.1.1.10 |
10.1.1.11 |
10.1.1.12 |
At this point, if all has gone to plan, you should have three independent Proxmox nodes sitting on their own IP addresses, each accessible via the web UI at https://<IP-ADDRESS>:8006. They’re not talking to each other yet, but that’s exactly what we’ll be tackling next.
What’s Next?
With Proxmox successfully installed on all your nodes, you’re ready to move beyond the defaults. In the next part, we’ll dive into essential post-installation optimisations. From setting up the community repositories and banishing that subscription nag screen to squeezing every bit of efficiency out of your hardware with ASPM and CPU scaling. We’ll even look at some life-saving helper scripts to get your cluster production-ready in record time.